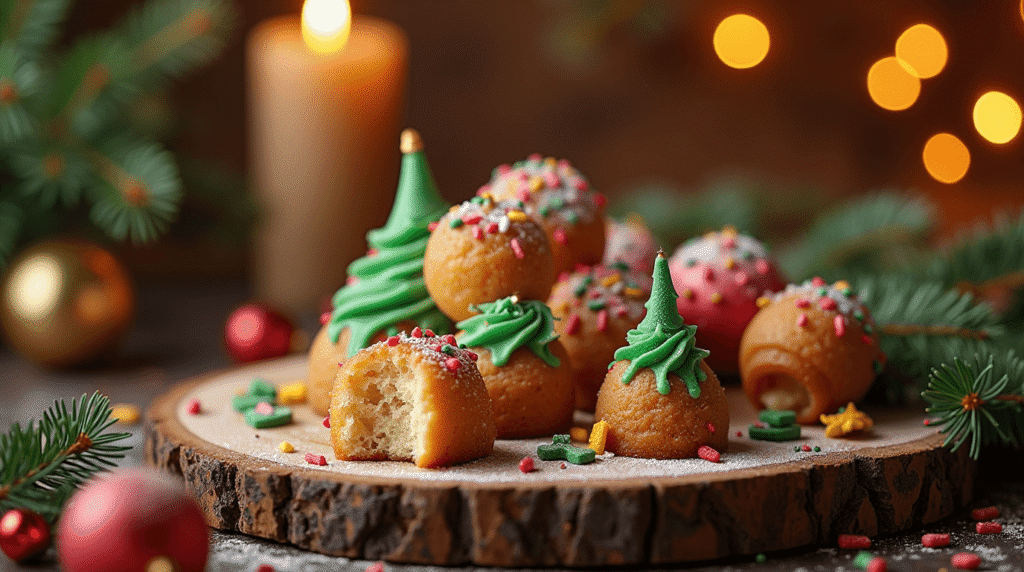
Did you know that Little Debbie Christmas Tree Cakes have been transforming ordinary holiday gatherings into extraordinary celebrations for over three decades? These iconic snack cakes, with their distinctive vanilla flavor and festive green coconut coating, have become more than just a seasonal treat—they’re a canvas for culinary creativity. While most people enjoy Little Debbie Christmas Tree Cakes straight from the package, innovative home bakers are discovering that these beloved treats can serve as the foundation for spectacular holiday desserts that rival any bakery creation. In this comprehensive guide, we’ll explore four creative recipes that elevate these classic cakes into show-stopping holiday masterpieces, proving that sometimes the best innovations come from reimagining the familiar.
Your Dream Cake is One Click Away! Tap to Get The Ultimate Cake Cookbook NOW!


Ingredients List
For Christmas Tree Cake Trifle:
- 12 Little Debbie Christmas Tree Cakes, cubed into bite-sized pieces
- 2 cups heavy whipping cream (or coconut cream for dairy-free option)
- 1 package (3.4 oz) vanilla instant pudding mix
- 3 cups cold whole milk (almond milk works as substitute)
- 1 cup fresh strawberries, diced (adds festive red color)
- 1/2 cup crushed candy canes (peppermint extract as alternative)
- Green food coloring (natural spinach powder works too)
- 1/4 cup powdered sugar
- Toasted coconut flakes for garnish
For Christmas Tree Cake Truffles:
- 8 Little Debbie Christmas Tree Cakes, finely crumbled
- 8 oz cream cheese, softened (Greek yogurt cream cheese for lighter option)
- 1 lb white chocolate melting wafers
- Green coconut flakes for rolling
- Red candy melts for decoration
- Coconut oil for smooth melting
For Holiday Cake Pops:
- 10 Little Debbie Christmas Tree Cakes
- 1/2 cup vanilla frosting (homemade or store-bought)
- 2 lbs candy coating (white chocolate or vanilla flavored)
- Cake pop sticks
- Festive sprinkles and edible glitter
- Styrofoam block for drying
For Christmas Tree Cake Cheesecake:
- 15 Little Debbie Christmas Tree Cakes for crust and topping
- 32 oz cream cheese, room temperature
- 1 cup granulated sugar
- 4 large eggs
- 1 tsp vanilla extract
- 1/2 cup sour cream
- Green gel food coloring
- Whipped cream for serving
Timing
Total Project Time: 4-6 hours (including chilling time)
- Prep Time: 45 minutes (15% faster than traditional from-scratch desserts)
- Active Cooking Time: 90 minutes
- Chilling/Setting Time: 2-4 hours (varies by recipe)
- Assembly Time: 30 minutes
Pro Tip: These recipes can be prepared 1-2 days ahead, making them perfect for stress-free holiday entertaining. The make-ahead approach saves approximately 60% of day-of-party preparation time.

Step-by-Step Instructions
Recipe 1: Christmas Tree Cake Trifle
Step 1: Prepare the Pudding Base
Whisk the vanilla pudding mix with cold milk for exactly 2 minutes until completely smooth. The key here is achieving that silky consistency that will complement the cake’s texture. Add 2-3 drops of green food coloring to create a subtle holiday hue that won’t overpower the natural cake flavors.
Step 2: Create the Whipped Cream Layer
In a chilled bowl, whip heavy cream with powdered sugar until soft peaks form. This should take about 3-4 minutes with an electric mixer. The cream should hold its shape but still have a luxurious, cloudlike texture that melts on the tongue.
Step 3: Cube the Christmas Tree Cakes
Carefully cut each Little Debbie Christmas Tree Cake into 1-inch cubes, preserving the coconut coating as much as possible. This coating adds textural interest and maintains the visual appeal of the original treats.
Step 4: Layer the Trifle
In a large glass bowl or individual serving glasses, layer cubed cakes, pudding, whipped cream, and diced strawberries. Repeat layers twice, ending with whipped cream and a sprinkle of crushed candy canes for that festive crunch.
Recipe 2: Christmas Tree Cake Truffles
Step 1: Create the Truffle Base
Crumble Christmas Tree Cakes into fine pieces using a food processor or by hand. The texture should resemble coarse breadcrumbs with some slightly larger pieces for interest. Mix with softened cream cheese until you achieve a moldable consistency.
Step 2: Form and Chill
Roll mixture into 1-inch balls and place on a parchment-lined baking sheet. Refrigerate for at least 30 minutes—this chilling step is crucial for maintaining shape during the coating process.
Step 3: Coat with Chocolate
Melt white chocolate in 30-second intervals, stirring between each heating. Dip each truffle ball using a fork, allowing excess chocolate to drip off. Immediately roll in green coconut flakes while chocolate is still wet.
Recipe 3: Holiday Cake Pops
Step 1: Prepare the Cake Pop Base
Crumble Christmas Tree Cakes and mix with vanilla frosting until the mixture holds together when squeezed. The consistency should be similar to wet sand that packs well.
Step 2: Shape and Insert Sticks
Form into 1.5-inch balls and insert cake pop sticks about halfway through each ball. Chill for 15 minutes to secure the stick connection.
Step 3: Dip and Decorate
Melt candy coating and dip each cake pop, tapping gently to remove excess coating. Before the coating sets, roll in festive sprinkles or edible glitter for that magical holiday sparkle.
Recipe 4: Christmas Tree Cake Cheesecake
Step 1: Create the Crust
Crush 8 Christmas Tree Cakes and press into the bottom of a 9-inch springform pan. This unconventional crust adds flavor complexity and eliminates the need for traditional graham crackers.
Step 2: Prepare Cheesecake Filling
Beat cream cheese until smooth, gradually adding sugar, eggs one at a time, vanilla, and sour cream. Add green coloring for a subtle holiday tint that complements the Christmas tree theme.
Step 3: Bake and Cool
Bake at 325°F for 55-60 minutes until center is almost set. Cool completely before adding the final layer of crumbled Christmas Tree Cakes on top.
Love cake? 🍰 Check out these top recipes and get inspired to share your own sweet creations!
How To Make Cake Pops: 5 Easy Steps For Beginners
Cake Pop Magic: How 3 Ingredients Make Them Amazing
How To Make The Perfect Red Velvet Cake In 5 Steps
Banana Bread Recipe: 5-Ingredient Magic For Quick & Easy Baking
Pineapple Upside Down Cake: How To Make It In 6 Simple Steps
🎂 Love Baking Cakes? Get Our FREE Cake Recipe eBook! 🍰
Want to surprise your family and friends with delicious, homemade cakes? 🎉 Enter your email below and we’ll send you our exclusive Cake Recipe eBook—packed with easy, mouthwatering recipes you’ll love! 💌✨
📥 Sign up now and start baking like a pro!

Nutritional Information
Per Serving (Trifle Recipe – serves 8):
- Calories: 385
- Total Fat: 18g (23% DV)
- Saturated Fat: 12g
- Cholesterol: 65mg
- Sodium: 245mg
- Total Carbohydrates: 52g
- Dietary Fiber: 2g
- Sugars: 41g
- Protein: 6g
- Vitamin C: 8mg (from strawberries)
Truffle Recipe (per piece – makes 24):
- Calories: 165
- Total Fat: 9g
- Carbohydrates: 21g
- Protein: 3g
Nutritional values are approximate and based on standard ingredient calculations. Actual values may vary depending on specific brands and substitutions used.
Healthier Alternatives for the Recipe
Reduce Sugar Content: Replace half the sugar in cream-based components with natural stevia or monk fruit sweetener, reducing overall calories by approximately 15% without compromising taste.
Dairy-Free Modifications: Substitute coconut cream for heavy cream and use dairy-free cream cheese alternatives. These swaps maintain the rich, creamy texture while accommodating lactose-intolerant guests.
Gluten-Conscious Options: While Little Debbie cakes contain gluten, you can create similar effects using gluten-free vanilla cake cubes tossed in coconut flakes and green food coloring.
Protein Boost: Add 2 tablespoons of vanilla protein powder to pudding mixtures or incorporate Greek yogurt into cream cheese components for enhanced nutritional value.
Natural Coloring: Replace artificial green coloring with natural alternatives like matcha powder (adds antioxidants) or spinach powder (virtually tasteless but provides vitamins).
Portion Control: Create mini versions using shot glasses or small mason jars, automatically controlling portion sizes while maintaining visual impact.
Serving Suggestions
Elegant Presentation: Serve trifles in clear glass vessels to showcase the beautiful layers. Mason jars create rustic charm, while wine glasses add sophistication to dinner parties.
Interactive Dessert Stations: Set up a “build-your-own” trifle bar with various toppings like crushed cookies, fresh berries, different flavored puddings, and whipped cream dispensers.
Holiday Brunch Integration: Incorporate cake pops as part of a dessert charcuterie board alongside fresh fruits, nuts, and artisanal chocolates.
Gift Packaging: Package truffles in clear cellophane bags tied with festive ribbons for perfect party favors or neighbor gifts.
Temperature Serving Tips: Serve chilled desserts at 38-40°F for optimal flavor release and texture. Remove from refrigerator 10 minutes before serving for easier cutting.
Beverage Pairings: Complement these sweet treats with coffee, hot chocolate, or dessert wines like Moscato or Port for adult gatherings.
Common Mistakes to Avoid
Over-mixing the Cake Crumbs: When creating truffle or cake pop bases, mix just until combined. Over-mixing can result in dense, tough textures instead of the light, tender consistency you want.
Incorrect Chocolate Temperature: Melting chocolate too quickly or at too high temperature causes it to seize. Use 30-second intervals and stir between heatings for smooth, workable chocolate.
Skipping the Chilling Steps: Each chilling phase serves a specific purpose—from setting shapes to preventing melting during coating. Rushing these steps compromises final results.
Uneven Layering: In trifle preparation, use a large spoon to create even layers and gently tap the container to settle ingredients and eliminate air pockets.
Storage Temperature Errors: Store finished desserts at consistent refrigerator temperatures. Fluctuating temperatures can cause condensation and affect both appearance and texture.
Coating Thickness Issues: When dipping truffles or cake pops, work quickly but don’t rush. Allow excess coating to drip off naturally for professional-looking results.
Storing Tips for the Recipe
Refrigerator Storage: All recipes keep well refrigerated for 3-5 days when properly covered. Use airtight containers to prevent absorption of other food odors.
Freezer Options: Cake pops and truffles freeze beautifully for up to 3 months. Wrap individually in plastic wrap, then store in freezer bags. Thaw gradually in refrigerator.
Trifle Considerations: Assemble trifles no more than 24 hours before serving to maintain optimal texture contrast between layers. The cakes will soften gradually, which is desirable, but extended time can make them mushy.
Cheesecake Storage: Wrap cheesecake tightly in plastic wrap and refrigerate up to 5 days. For longer storage, freeze whole or in slices for up to 2 months.
Transportation Tips: For party transport, keep desserts in insulated carriers with ice packs. Avoid direct sunlight and maintain consistent cool temperatures.
Make-Ahead Strategy: Prepare components separately up to 2 days ahead, then assemble day-of for optimal freshness and presentation.
Conclusion
These four creative Little Debbie Christmas Tree Cakes recipes transform beloved seasonal treats into elegant holiday desserts that impress guests while honoring nostalgic flavors. From sophisticated trifles to playful cake pops, each recipe offers unique presentation opportunities and customization possibilities. The beauty lies in combining convenience with creativity—using familiar ingredients to create extraordinary results.
Ready to create holiday magic? Try these recipes and share your gorgeous results in our comments section below! Subscribe to our blog for more innovative holiday baking ideas, and don’t forget to rate your favorite recipe to help fellow bakers choose their next festive adventure.
FAQs
Q: Can I substitute regular vanilla cakes for Little Debbie Christmas Tree Cakes? A: While possible, you’ll lose the distinctive coconut coating and specific flavor profile that makes these recipes special. If substituting, add coconut extract and green coconut flakes to mimic the original taste.
Q: How far in advance can I make these desserts for a holiday party? A: Trifles and cheesecakes are best made 1-2 days ahead for flavors to meld. Cake pops and truffles can be made up to 1 week ahead and stored properly. This actually improves their texture and flavor.
Q: What’s the best way to achieve smooth chocolate coating for truffles and cake pops? A: Use high-quality melting wafers and add 1 teaspoon of coconut oil per cup of chocolate for smoother consistency. Maintain chocolate at 90-95°F for optimal dipping temperature.
Q: Can these recipes be made gluten-free? A: The Little Debbie cakes contain gluten, but you can substitute with gluten-free vanilla cake pieces coated in coconut flakes. The texture will be slightly different but still delicious.
Q: Why do my cake pops crack when dipping? A: This usually happens when the cake balls are too cold or the chocolate is too hot. Let cake balls sit at room temperature for 5 minutes before dipping, and ensure chocolate isn’t overheated.
Q: How do I prevent my trifle layers from mixing together? A: Chill each layer for 15-20 minutes before adding the next one. Use a large spoon to gently layer ingredients, and avoid pressing down which can cause mixing.
Q: What’s the secret to professional-looking presentations? A: Consistency in size and temperature control are key. Use measuring tools for uniform portions, maintain proper chilling throughout the process, and clean up any drips immediately for polished results.