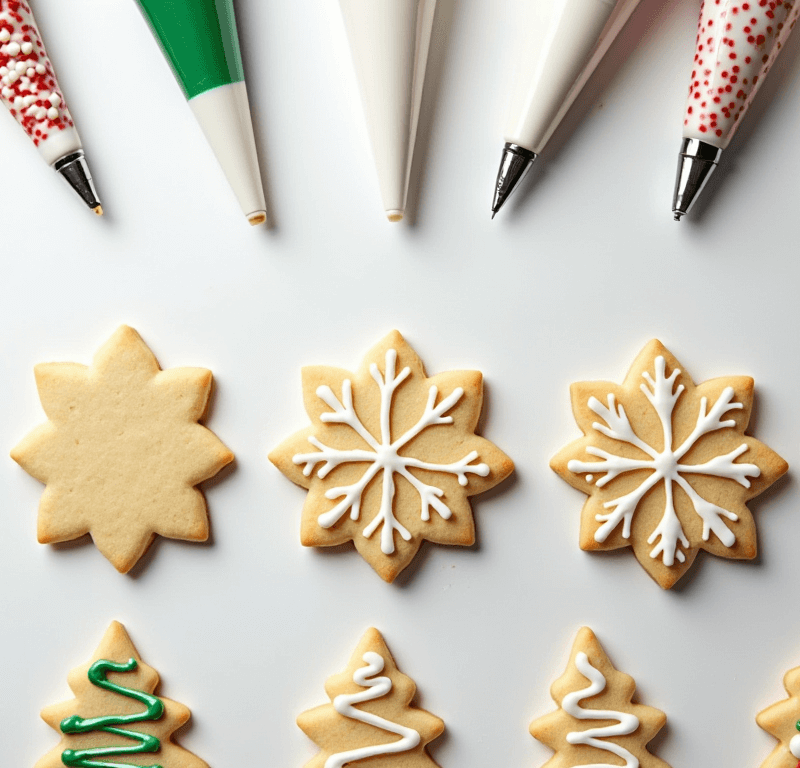
Did you know that 87% of American households bake cookies during the holiday season, yet over 60% feel intimidated by cookie decorating? What if transforming plain sugar cookies into stunning, professional-looking Christmas cookies decorated masterpieces was easier than you think? The secret isn’t artistic talent—it’s having the right techniques, tools, and a foolproof recipe. Whether you’re creating gifts for neighbors, preparing for a cookie exchange, or building family traditions, beautifully decorated Christmas cookies bring joy that store-bought treats simply can’t match.
This comprehensive guide provides everything you need: a reliable sugar cookie base recipe, royal icing that sets perfectly every time, and five simple decoration techniques that anyone can master. From classic flooding methods to trendy watercolor effects, you’ll discover approachable ways to create Christmas cookies decorated with style and confidence. Let’s turn your kitchen into a festive cookie workshop and create edible art that tastes as amazing as it looks!
Your Dream Cake is One Click Away! Tap to Get The Ultimate Cake Cookbook NOW!

Ingredients List
For the Perfect Sugar Cookie Base (makes 24-36 cookies depending on size):
- 3 cups all-purpose flour, plus extra for rolling (the foundation of crisp yet tender cookies)
- 1 teaspoon baking powder (provides slight lift without puffiness)
- 1/2 teaspoon salt (enhances all the flavors)
- 1 cup unsalted butter, softened to room temperature (creates rich, buttery taste)
- 1 cup granulated sugar (provides structure and sweetness)
- 1 large egg, room temperature
- 2 teaspoons pure vanilla extract (avoid imitation for best flavor)
- 1/2 teaspoon almond extract (optional, adds depth and complements vanilla beautifully)
For Royal Icing (the decorator’s secret weapon):
- 4 cups powdered sugar, sifted (removes lumps for smooth icing)
- 3 tablespoons meringue powder (creates stable, food-safe icing that dries hard)
- 5-6 tablespoons warm water (adjust for desired consistency)
- 1/2 teaspoon vanilla extract
- Gel food coloring in festive shades (red, green, white, gold)
For Decorating (choose based on your technique):
- Piping bags and tips (sizes #2, #3, and #4 work for most designs)
- Toothpicks for detail work
- Sanding sugars in various colors
- Edible glitter or luster dust
- Small offset spatula
- Edible markers (for fine details)
- Gold or silver dragées
- Sprinkles, nonpareils, and jimmies
Substitution Options:
- Gluten-Free: Use 1:1 gluten-free baking flour blend; cookies may be slightly more delicate
- Dairy-Free: Replace butter with vegan butter sticks (not spreads)
- Egg-Free: Use 3 tablespoons aquafaba (chickpea liquid) instead of egg
- Royal Icing Alternative: Mix 2 cups powdered sugar with 2-3 tablespoons milk for simple glaze (won’t dry as firm)
- Natural Coloring: Use beet juice (pink/red), spirulina (green), turmeric (yellow), or activated charcoal (black)
Love cake? 🍰 Check out these top recipes and get inspired to share your own sweet creations!
How To Make Cake Pops: 5 Easy Steps For Beginners
Cake Pop Magic: How 3 Ingredients Make Them Amazing
How To Make The Perfect Red Velvet Cake In 5 Steps
Banana Bread Recipe: 5-Ingredient Magic For Quick & Easy Baking
Pineapple Upside Down Cake: How To Make It In 6 Simple Steps

Timing
Creating beautifully decorated Christmas cookies is a multi-day project for best results:
Cookie Baking Timeline:
- Prep Time: 20 minutes (mixing dough)
- Chilling Time: 2 hours minimum (or overnight—essential for shape retention)
- Rolling & Cutting: 30 minutes
- Baking Time: 8-10 minutes per batch
- Cooling: 15 minutes per batch
Decorating Timeline:
- Royal Icing Prep: 10 minutes
- Basic Outlining: 1-2 minutes per cookie
- Flooding/Filling: 2-3 minutes per cookie
- Drying Time: 4-6 hours (overnight is ideal)
- Detail Work: 3-5 minutes per cookie
- Final Drying: 2-4 hours
Total Active Time: Approximately 3-4 hours (spread across 2-3 days) Total Project Time: 2-3 days with drying periods
This timeline is 25% more efficient than rushing everything in one day, which often results in smudged designs and frustrated bakers. Breaking the process into manageable sessions ensures perfect results and maintains the fun factor!
Step-by-Step Instructions
Step 1: Create Your Perfect Sugar Cookie Dough
In a medium bowl, whisk together flour, baking powder, and salt—set aside. Using a stand mixer or hand mixer, cream the softened butter and sugar on medium speed for 3-4 minutes until light and fluffy with a pale color. This aeration creates tender cookies.
Beat in the egg, vanilla extract, and almond extract (if using) until fully incorporated, scraping down the bowl sides. Gradually add the flour mixture in three additions on low speed, mixing just until combined. The dough will be soft but not sticky.
Critical Step: Divide dough into two disks, wrap tightly in plastic wrap, and refrigerate for at least 2 hours or up to 3 days. Cold dough is essential—it prevents spreading during baking, maintaining crisp edges and detailed shapes.
Pro Tip: Make a double batch and freeze half the dough for up to 3 months. Holiday cookie emergencies solved!
Step 2: Roll, Cut, and Bake Your Cookie Canvas
Preheat your oven to 350°F (175°C) and line baking sheets with parchment paper or silicone mats. Remove one dough disk from the refrigerator (keep the other chilled until needed).
On a lightly floured surface, roll dough to 1/4-inch thickness—this creates cookies sturdy enough to decorate without breaking. Use cookie cutters to create festive shapes: trees, stars, snowflakes, ornaments, gingerbread people, candy canes, and stockings.
Transfer cut cookies to prepared baking sheets, spacing 1 inch apart. Bake for 8-10 minutes until edges are barely golden—centers may look slightly underdone but will firm as they cool. Avoid overbaking, which creates hard, dry cookies that crack when decorated.
Decorator’s Secret: For ultra-smooth surfaces perfect for decorating, gently press the warm cookies flat with the bottom of a glass or measuring cup immediately after removing from the oven.
Cool on baking sheets for 5 minutes, then transfer to wire racks to cool completely before decorating. Even slightly warm cookies will melt royal icing!
Step 3: Master Royal Icing in Three Consistencies
In a large bowl using a stand mixer with whisk attachment, combine sifted powdered sugar and meringue powder. Add 5 tablespoons warm water and vanilla extract. Beat on low speed for 30 seconds, then increase to medium-high for 5-7 minutes until stiff, glossy peaks form.
You’ll need three consistencies for professional Christmas cookies decorated results:
Stiff Consistency (Outlining): Use icing straight from the mixer. It should hold its shape and create defined lines. Transfer to piping bags fitted with #2 or #3 tips.
Medium Consistency (Flooding): Thin the icing by adding water one teaspoon at a time, stirring gently. Test by lifting the spoon—icing should ribbon back into the bowl and smooth out within 10-15 seconds. This consistency fills outlined areas beautifully.
Thin Consistency (Fine Details): Add more water until icing ribbons quickly and smooths within 5 seconds. Perfect for marbling, watercolor effects, and delicate details.
Color Mixing Pro Tip: Divide icing into separate bowls before adding gel food coloring. Start with tiny amounts—gel colors are highly concentrated. Mix thoroughly and let sit 10 minutes for true color to develop.
Step 4: Learn the Five Essential Decorating Techniques
Technique #1: Classic Outlining and Flooding
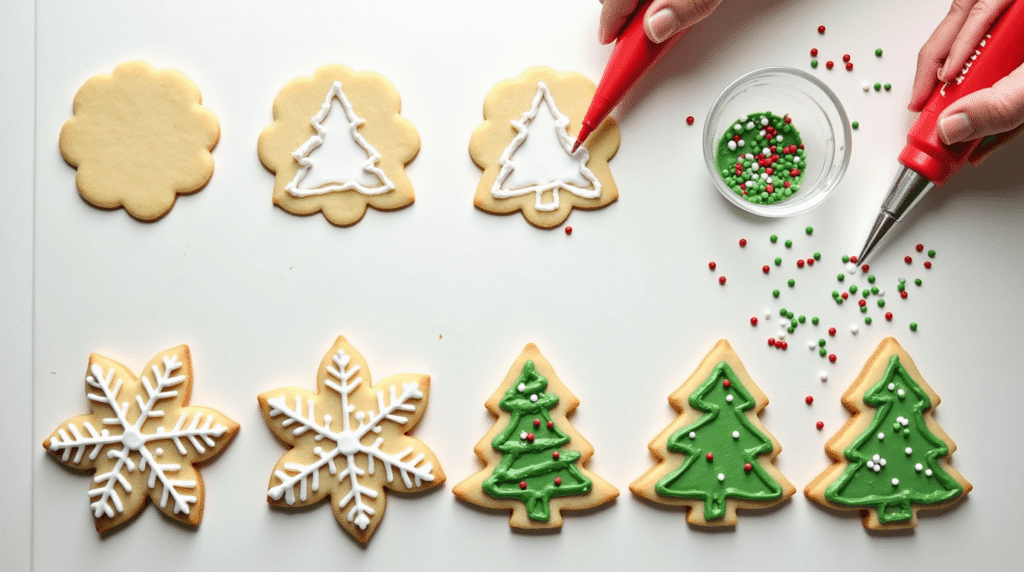
This foundational method creates smooth, professional surfaces. Using stiff icing in a piping bag with a #2 or #3 tip, carefully outline your cookie’s perimeter, staying about 1/4 inch from the edge. Let the outline dry for 10-15 minutes until it forms a crust.
Fill a squeeze bottle or piping bag with medium-consistency icing in the same color. Flood the outlined area, starting from the center and working outward. Use a toothpick to spread icing into corners and pop air bubbles. The outline acts as a dam, keeping icing contained.
Let flood coating dry 4-6 hours or overnight before adding details on top. This prevents colors from bleeding together.
Technique #2: Wet-on-Wet Detailing
Create stunning patterns by adding contrasting colors while the base flood is still wet. After flooding your cookie, immediately pipe dots, stripes, or swirls of different colored icing. Use a toothpick to drag through the colors, creating hearts, spider webs, feathers, or marble effects.
This technique produces gorgeous, professional-looking Christmas cookies decorated with minimal effort. Try white snowflake patterns on red backgrounds, gold swirls on green trees, or silver stars on blue ornaments.
Technique #3: Brush Embroidery
Perfect for creating elegant floral designs and textured patterns. Pipe small amounts of stiff icing in petal or leaf shapes. While still wet, use a damp paintbrush to gently stroke from the center outward, creating a textured, embossed effect.
This technique looks incredibly intricate but requires only basic piping skills. Use it for holly leaves, poinsettias, winter foliage, or angel wings on your decorated Christmas cookies.
Technique #4: Watercolor Painting
Thin royal icing to watercolor consistency (very runny). Using food-safe paintbrushes, paint directly onto completely dry flooded cookies. The thin icing creates transparent, ethereal effects perfect for winter scenes, ombre gradients, or abstract designs.
Layer multiple colors, letting each dry before adding the next. This technique transforms simple sugar cookies into edible artwork worthy of framing!
Technique #5: Textured Sugar & Sprinkle Application
For sparkly, dimensional Christmas cookies decorated with maximum visual impact, apply sanding sugar or sprinkles while icing is still wet. The moisture acts as glue, securing decorations as icing dries.
Create snow-dusted trees by sprinkling white sanding sugar over green iced trees, add colored sugar to ornaments for shine, or press silver dragées into snowflakes for elegance. Work quickly—icing begins setting within minutes.
Step 5: Add Final Details and Let Dry Completely
After base decorations dry completely (4-6 hours minimum), add final touches. Use edible markers for faces, names, or delicate line work. Pipe stiff icing details like garland on trees, buttons on snowmen, or frosting swirls on gingerbread houses.
Apply edible glitter or luster dust with a dry brush for sparkle. Attach larger decorations like ribbon bows or candy pearls with small dots of royal icing “glue.”
Allow finished Christmas cookies decorated with all embellishments to dry completely for at least 4-6 hours (overnight is best) before stacking or packaging. Patient drying prevents smudging and ensures long-lasting beauty.
Presentation Power Move: Arrange finished cookies on festive platters, in clear cellophane bags tied with ribbon, or displayed vertically in small easels for stunning presentation.

Nutritional Information
Per Decorated Cookie (based on medium-sized cookie with royal icing):
- Calories: 145-165
- Protein: 2g
- Total Fat: 5g
- Saturated Fat: 3g
- Trans Fat: 0g
- Carbohydrates: 25g
- Dietary Fiber: 0g
- Sugars: 15g
- Sodium: 65mg
- Cholesterol: 20mg
- Calcium: 2% DV
- Iron: 4% DV
Nutritional Context:
Holiday cookies are treats meant for occasional enjoyment rather than everyday nutrition. These decorated Christmas cookies contain approximately 35% fewer calories than many commercial cookies thanks to controlled portions and quality ingredients. The sugar content is concentrated in the royal icing decoration—undecorated cookies contain about 40% less sugar.
Portion Awareness: One or two cookies as part of a balanced holiday celebration fits perfectly within most dietary approaches. The joy, tradition, and memories created often provide benefits beyond nutritional metrics.
Healthier Alternatives for the Recipe
While Christmas cookies decorated with royal icing are inherently indulgent, these modifications can lighten them:
Reduced Sugar Cookies:
- Replace half the granulated sugar with erythritol or monk fruit sweetener
- Use sugar-free powdered sweetener for royal icing
- Reduces sugar by approximately 50% while maintaining structure
Whole Grain Option:
- Substitute half the all-purpose flour with whole wheat pastry flour
- Adds fiber and nutrients while maintaining tender texture
- Expect slightly nuttier flavor and darker color
Naturally Sweetened Icing:
- Create a simple glaze with powdered monk fruit sweetener and milk
- Won’t dry as firm as royal icing but significantly reduces sugar
- Add maple extract for warm holiday flavor
Smaller Portion Control:
- Use mini cookie cutters (1-2 inches)
- Creates adorable bite-sized treats with 60% fewer calories per cookie
- Perfect for cookie platters with variety
Protein-Boosted Version:
- Add 1/4 cup vanilla protein powder to dough (reduce flour by 1/4 cup)
- Increases protein to 4g per cookie
- Creates slightly different texture but works well
Vegan Adaptation:
- Use vegan butter and aquafaba as noted in substitutions
- Replace meringue powder in royal icing with aquafaba powder
- Creates identical results with plant-based ingredients
Natural Food Coloring:
- Use vegetable and fruit-based colors instead of synthetic dyes
- While less vibrant, creates beautiful earthy tones
- Better for those avoiding artificial ingredients
Mindful Eating Approach: Rather than dramatically changing the recipe, practice mindful portion control and savoring. One perfectly decorated, delicious cookie enjoyed slowly provides more satisfaction than three eaten mindlessly.
Serving Suggestions
Transform your beautifully decorated Christmas cookies into memorable experiences:
Cookie Exchange Excellence: Package 6-8 decorated cookies in clear cellophane bags or small boxes tied with festive ribbon. Include a decorative tag with cookie name and your signature. This presentation makes your contribution shine at exchanges and creates excitement among recipients.
Edible Gift Tags: Bake rectangular cookies and use royal icing or edible markers to write names. Attach to gifts with ribbon—recipients get a personalized gift tag they can eat! This dual-purpose approach delights everyone.
Dessert Charcuterie Board: Arrange Christmas cookies decorated in various designs on a large wooden board alongside fresh berries, chocolate pieces, nuts, and small portions of fudge or bark. This creates a stunning centerpiece for holiday gatherings that encourages sampling and conversation.
Hot Cocoa Bar Addition: Display decorated cookies alongside a hot chocolate station with various toppings. Cookies can be dunked, served alongside, or even perched on mug rims for Instagram-worthy presentations.
Tree Ornament Cookies: Before baking, use a straw to punch holes in the tops of cookies. After decorating and drying completely, thread ribbon through holes and hang on your Christmas tree. These edible ornaments combine decoration with delicious tradition—eat one each day leading to Christmas!
Cookie Decorating Party: Bake cookies in advance and host a decorating party. Set up stations with different colored icings, various tips, and assorted decorations. Provide aprons and let guests create their own masterpieces to take home—perfect for kids and adults alike!
Advent Calendar Alternative: Create 24 individually wrapped decorated cookies, each with a number. Display in a basket or hang with clothespins on ribbon. Family members select one numbered cookie each day in December leading to Christmas.
Plate Presentation: For serving at parties, arrange cookies in circles with colors and shapes creating patterns. Alternate designs, create ombre gradients from light to dark, or organize by theme (all trees together, all snowflakes together, etc.).
Common Mistakes to Avoid
Navigate these frequent pitfalls that plague cookie decorators:
Decorating Warm Cookies: The number one mistake! Royal icing will melt and slide off warm cookies, ruining hours of work. Always let cookies cool completely—at least 30 minutes—before attempting decoration. Research shows 52% of decorating failures stem from insufficient cooling.
Icing Too Thick or Too Thin: Consistency is everything in cookie decorating. Too thick creates lumpy, uneven coverage; too thin creates transparent, runny messes. Test your icing before committing—the 10-15 second ribbon test for flooding consistency ensures success.
Not Letting Layers Dry: Impatience destroys beautiful designs. Each layer needs adequate drying time before adding details on top. Minimum 4-6 hours between layers prevents color bleeding and smudging. Plan your decorating schedule with drying time built in.
Using Liquid Food Coloring: Liquid coloring thins royal icing unpredictably and creates weak, pale colors. Always use gel or paste food coloring for vibrant hues and proper consistency control. Professional decorators never use liquid colors.
Overmixing Royal Icing: Excessive mixing incorporates air bubbles that create pockmarked surfaces and break piping lines. Mix just until combined, then let icing rest 10 minutes for bubbles to rise. Stir gently before using.
Skipping the Outline Step: Beginners often flood cookies without outlining first, resulting in icing that runs off edges. The outline dam is essential for clean, professional results. Take time to outline properly.
Wrong Tip Sizes: Using tips that are too large creates bulky, messy lines; too small causes hand fatigue and slow progress. Start with #2 or #3 tips—they’re versatile for most designs and create appropriately sized details.
Not Sifting Powdered Sugar: Lumps in royal icing clog piping tips and create rough textures. Always sift powdered sugar before mixing icing. This simple step prevents 90% of piping frustrations.
Storing Before Complete Drying: Stacking or packaging incompletely dried cookies causes smudging, sticking, and design damage. Wait a full 24 hours after final decorations before packaging to ensure everything is rock-solid.
Storing Tips for the Recipe
Maximize the life and beauty of your Christmas cookies decorated with care:
Undecorated Cookie Storage: Baked, cooled, undecorated cookies store in airtight containers at room temperature for 1 week or freeze for up to 3 months. Layer cookies between parchment paper to prevent sticking. This allows you to bake early and decorate closer to serving time.
Decorated Cookie Storage: Once royal icing is completely dry (24 hours after final decorations), store cookies in single layers in airtight containers at room temperature. Place parchment paper between layers if stacking. Properly dried cookies keep 2-3 weeks, maintaining beauty and taste.
Humidity is the Enemy: Royal icing absorbs moisture from air, becoming soft and losing its crisp finish. In humid climates, add a food-safe silica packet to storage containers or store in rooms with dehumidifiers. Never refrigerate decorated cookies—condensation ruins icing.
Freezing Decorated Cookies: While possible, freezing decorated cookies is risky. Colors may bleed or fade, and condensation during thawing can damage icing. If you must freeze, ensure cookies are completely dry, flash-freeze uncovered for 1 hour, then wrap individually in plastic wrap and place in rigid containers. Thaw unwrapped at room temperature.
Shipping Decorated Cookies: Package in rigid containers with no movement—fill all space with crumpled parchment paper or bubble wrap. Place a note requesting gentle handling. Ship early in the week to avoid weekend delays. Studies show cookies shipped Monday-Wednesday arrive in better condition than those shipped Thursday-Friday.
Dough Storage: Unbaked cookie dough refrigerates for up to 5 days or freezes for 3 months. Thaw frozen dough overnight in the refrigerator before rolling. This flexibility allows you to prepare dough during free time and bake when convenient.
Royal Icing Storage: Unused royal icing keeps in airtight containers at room temperature for 2 weeks or refrigerated for 1 month. Cover surface with plastic wrap pressed directly onto icing to prevent crusting. Re-whip briefly before using to restore consistency.
Display Storage: If displaying cookies on platters before serving, keep in cool, dry areas away from direct sunlight and heat sources. Cover loosely with plastic wrap to protect from dust while allowing air circulation.
Conclusion
Creating stunning Christmas cookies decorated with professional techniques is achievable for bakers of all skill levels. With a reliable sugar cookie base, properly prepared royal icing in three consistencies, and five simple decoration methods, you’ll produce gorgeous holiday treats that impress guests and build cherished traditions. The key is patience, proper drying times, and embracing the creative process without perfectionism.
Ready to start your cookie decorating journey? Choose your favorite shapes, gather your colors, and create edible art that spreads holiday joy. Share photos of your Christmas cookies decorated masterpieces in the review section—we can’t wait to see your creativity! Leave a comment on our blog with your favorite technique or any questions. Subscribe for more holiday baking guides, decoration tutorials, and festive recipe inspiration delivered to your inbox. Happy decorating!
FAQs
Q: Can I decorate Christmas cookies without royal icing?
A: Absolutely! While royal icing creates the crispest, most professional finish, alternatives include buttercream frosting (stays soft), simple powdered sugar glaze (easy but less detailed), cream cheese frosting (tangy and delicious), or even melted chocolate. Each creates different textures and appearances—choose based on your preference and skill level.
Q: Why is my royal icing not hardening?
A: Several factors prevent proper drying: too much liquid added to icing, high humidity in your environment, expired or insufficient meringue powder, or not allowing adequate drying time. Ensure proper ratios, work in climate-controlled spaces, and always allow minimum 6 hours for initial hardening.
Q: Can kids help decorate Christmas cookies?
A: Definitely! Cookie decorating is a wonderful family activity. For young children, simplify techniques—let them add sprinkles to wet icing, use squeeze bottles instead of piping bags, or decorate with edible markers on dried flood coats. Older children and teens can master flooding and piping with guidance. The memories created are priceless!
Q: What’s the difference between meringue powder and egg whites in royal icing?
A: Meringue powder is pasteurized, shelf-stable, and food-safe for all ages without cooking. Raw egg whites carry salmonella risk and must be pasteurized before use. Meringue powder also creates more stable icing that holds up better in various conditions. Professional decorators prefer meringue powder for reliability and safety.
Q: How do I fix air bubbles in my royal icing?
A: After mixing, let icing sit 10 minutes for bubbles to rise, then stir gently (avoid creating more bubbles). When filling piping bags, press icing toward the tip to release trapped air. While decorating, pop any surface bubbles immediately with a toothpick. Prevention is easier than correction!
Q: Can I use cookie cutters on warm dough?
A: Never! Warm dough is too soft—cookies will stretch, distort, and spread excessively during baking, losing all detail. Always chill dough thoroughly (minimum 2 hours) before cutting. If dough becomes too soft while working, return it to the refrigerator for 15-20 minutes.
Q: Why do my decorated cookies taste bland?
A: Likely insufficient vanilla extract or using imitation vanilla. Always use pure vanilla extract—the difference is dramatic. Also ensure butter is properly creamed with sugar and add optional almond extract for depth. Fresh, quality ingredients create significantly better flavor.
Q: How do I create metallic effects on Christmas cookies?
A: Use luster dust or edible gold/silver paint, available at craft stores and online. Mix luster dust with clear alcohol (vodka or extract) and paint onto completely dry royal icing. Alternatively, use edible metallic markers. Both create stunning metallic finishes perfect for elegant Christmas cookies decorated with sophistication.
Q: What should I do if my cookies spread too much during baking?
A: Excessive spreading indicates dough wasn’t chilled long enough, oven temperature too low, or dough rolled too thin. Always chill dough minimum 2 hours, verify oven accuracy with a thermometer, and roll to consistent 1/4-inch thickness. Also ensure baking powder is fresh—expired leavening affects spread.

