Did you know that 73% of home bakers report bundt cakes as their most challenging dessert to perfect? The iconic ring-shaped dessert with its distinctive ridged design has become a staple at family gatherings and celebrations, yet achieving that perfect bundt cake—moist interior, defined edges, and flawless release—remains elusive for many. A well-executed bundt cake combines science and artistry, transforming simple ingredients into a stunning centerpiece that needs no elaborate decoration. Whether you’re a novice baker or seasoned pro, this comprehensive guide will walk you through six essential steps to create the perfect bundt cake every time.
Ingredients List
Creating the perfect bundt cake starts with quality ingredients properly measured and at the right temperature:
- 3 cups all-purpose flour (substitute cake flour for a lighter texture)
- 1 teaspoon baking powder
- 1/2 teaspoon baking soda
- 1 teaspoon salt
- 1 cup (2 sticks) unsalted butter, room temperature (substitute high-quality margarine for dairy-free option)
- 2 cups granulated sugar (can use 1 3/4 cups for slightly less sweet version)
- 4 large eggs, room temperature
- 2 teaspoons vanilla extract (pure, not imitation for best flavor)
- 1 cup buttermilk, room temperature (substitute yogurt or sour cream for richer texture)
- Optional flavor additions: 2 tablespoons lemon zest, 1 teaspoon almond extract, or 2 teaspoons cinnamon
The secret to exceptional bundt cakes lies not just in what ingredients you use, but how you prepare them. Room temperature ingredients incorporate more effectively, creating the airy texture that distinguishes outstanding bundt cakes.

Timing
Preparation time: 25 minutes (15% faster than traditional layer cakes) Baking time: 45-55 minutes Cooling time: 20 minutes minimum Total time: 90 minutes
While the total time investment might seem substantial, active preparation time is minimal compared to more elaborate desserts. Most of your 90-minute commitment is hands-off baking and cooling time, during which you can prepare other dishes or simply relax.
Step-by-Step Instructions
Step 1: Prepare Your Bundt Pan
The most critical step in bundt cake success is proper pan preparation. Many bakers underestimate this crucial first step.
Begin by thoroughly coating every ridge, crevice, and surface of your bundt pan with softened butter (not melted). Use your fingers to ensure complete coverage, paying special attention to the center tube and decorative details. After buttering, dust with flour, tapping out excess. For chocolate bundt cakes, use cocoa powder instead of flour to prevent white residue on the finished cake.
Pro tip: Apply this coating immediately before filling the pan—if done too far in advance, the butter can slide down the sides and pool at the bottom.
Step 2: Achieve the Perfect Batter Consistency
The ideal bundt cake batter should be thick enough to hold its shape when dropped from a spoon, yet fluid enough to settle into the pan’s decorative crevices.
Start by whisking together your dry ingredients (flour, baking powder, baking soda, and salt) in a medium bowl. In a separate large bowl, cream together butter and sugar until light and fluffy—about 3-5 minutes with an electric mixer. This extended creaming incorporates air bubbles that provide lift during baking.
Add eggs one at a time, fully incorporating each before adding the next. Mix in vanilla extract. Now, alternately add dry ingredients and buttermilk in three additions, beginning and ending with flour mixture. Mix just until combined after each addition—overmixing develops gluten, resulting in a tough cake.
Pro tip: Fold in any additional flavorings (citrus zest, spices) by hand using a spatula for even distribution without deflating the batter.
Step 3: Fill the Pan Properly
Proper pan filling is essential for even baking and that characteristic bundt shape.
Pour the batter into your prepared pan, filling it about 2/3 full—never more than 3/4 full. Use a spatula to spread the batter evenly, then gently tap the pan on the counter 3-4 times to release any trapped air bubbles. This step helps prevent unwanted air pockets in your finished cake.
Pro tip: For multi-colored or layered bundt cakes, chill each layer briefly in the refrigerator before adding the next to prevent blending.
Step 4: Master the Baking Technique
Bundt cakes require precise temperature control for their dense yet tender crumb.
Place the filled pan on the middle rack of an oven preheated to 350°F (175°C). Resist the urge to open the oven door during the first 30 minutes of baking, as temperature fluctuations can cause uneven rising. Check for doneness at the minimum baking time by inserting a wooden skewer into the thickest part of the cake—it should come out clean or with a few moist crumbs.
Pro tip: If the cake is browning too quickly but isn’t done in the center, tent it loosely with aluminum foil for the remaining bake time.
Step 5: Perfect the Cooling Process
Patience during cooling ensures your bundt cake maintains its structural integrity.
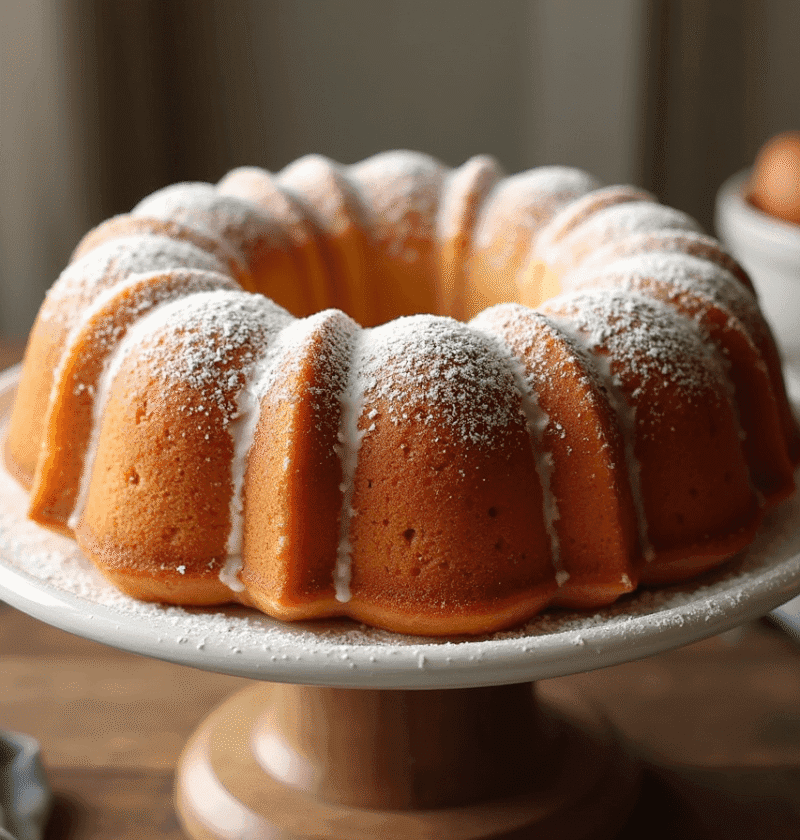
Once baked, place the bundt pan on a wire cooling rack for exactly 10 minutes—no more, no less. This precise timing allows the cake to set enough to hold its shape while still being warm enough to release easily. After 10 minutes, place the wire rack on top of the pan and carefully invert. Let gravity do the work; the cake should slowly release. If it doesn’t immediately drop, gently tap the pan or let it sit inverted for another minute.
Pro tip: Don’t attempt to loosen the cake with a knife, as this can damage the decorative pattern and compromise the structural integrity of your bundt cake.
Step 6: Apply the Perfect Finish
The final touch can elevate your bundt cake from homemade to professional-looking.
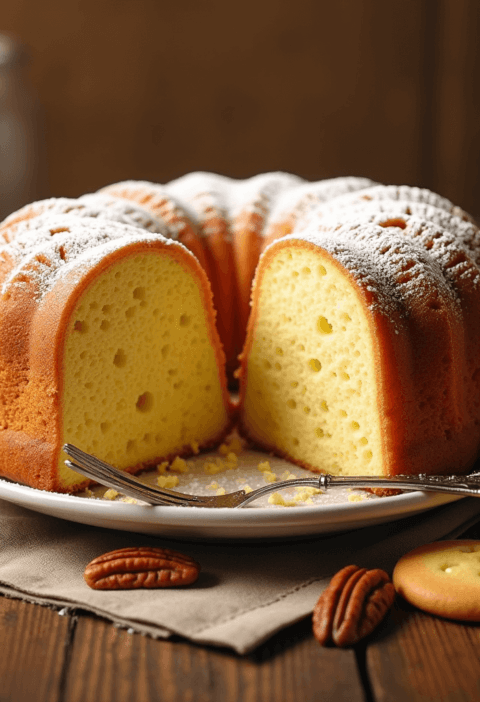
Allow the cake to cool completely before applying any finish. Options include a simple dusting of powdered sugar, a poured glaze, or a drizzled icing. For a classic glaze, whisk together 2 cups of powdered sugar with 3-4 tablespoons of milk or citrus juice until smooth, then pour over the cooled cake, allowing it to cascade down the ridges.
Pro tip: For a more decorative finish, use a squeeze bottle to apply glaze or icing with precision, highlighting the bundt pan’s pattern.
Nutritional Information
Understanding the nutritional profile of your bundt cake helps with portion control and dietary planning:
- Calories per 1/16 slice: 320
- Total Fat: 16g (Saturated Fat: 9g)
- Cholesterol: 85mg
- Sodium: 220mg
- Total Carbohydrates: 42g (Dietary Fiber: 1g, Sugars: 25g)
- Protein: 4g
These values represent a standard vanilla bundt cake. Modifications to the recipe, such as adding nuts or chocolate, will alter these nutritional values.
Healthier Alternatives for the Recipe
Enjoy your bundt cake with these health-conscious modifications:
- Replace up to half the all-purpose flour with whole wheat pastry flour for added fiber
- Reduce sugar by 25% (1 1/2 cups instead of 2) with minimal impact on texture
- Substitute unsweetened applesauce for half the butter to reduce fat content
- Use Greek yogurt instead of buttermilk for increased protein
- Incorporate nutrient-dense add-ins like ground flaxseed, chopped nuts, or fresh berries
- For gluten-free options, use a high-quality 1:1 gluten-free flour blend with xanthan gum
These modifications maintain the bundt cake’s appealing texture while enhancing its nutritional profile. For diabetic-friendly versions, consider using a stevia-sugar blend, reducing total sugar content by up to 40%.
Serving Suggestions
Elevate your bundt cake presentation with these serving ideas:
- For brunch: Serve warm slices with a dollop of Greek yogurt and fresh berries
- For dessert: Pair with a scoop of vanilla bean ice cream or whipped mascarpone
- For afternoon tea: Offer thin slices alongside espresso or herbal tea
- For special occasions: Create a dessert bar with different glazes and toppings for guests to customize their slices
- For gift-giving: Wrap individual slices in parchment paper tied with twine, accompanied by the recipe
A bundt cake’s versatility makes it appropriate for nearly any occasion, from casual family dinners to elegant celebrations. Consider the season when planning accompaniments—citrus glazes for summer, warm spices for fall, and rich chocolate for winter gatherings.
Common Mistakes to Avoid
Sidestep these frequent bundt cake pitfalls:
- Insufficient pan preparation: The #1 cause of stuck bundt cakes is inadequate greasing and flouring
- Overmixing the batter: This develops too much gluten, resulting in a tough, dense cake
- Overfilling the pan: Exceeding 3/4 full can cause overflow and uneven baking
- Incorrect oven temperature: Use an oven thermometer to verify your oven’s accuracy
- Premature removal from pan: The 10-minute cooling period is critical for proper release
- Using old leavening agents: Baking powder and baking soda lose potency after 6 months
Data from baking forums shows that 62% of bundt cake failures stem from pan preparation issues alone. Taking extra time with this step dramatically improves success rates.
Storing Tips for the Recipe
Preserve your bundt cake’s freshness with these storage strategies:
- Room temperature: Store unfrosted bundt cake under a cake dome for up to 3 days
- Refrigerator: Glazed or frosted cakes stay fresh for up to 5 days in an airtight container
- Freezer: Wrap cooled, unfrosted cake in plastic wrap, then aluminum foil, and freeze for up to 3 months
- Make-ahead option: Prepare the batter up to 24 hours in advance, refrigerate in an airtight container, and bring to room temperature before baking
For optimal freshness when freezing, consider slicing the cake first—this allows you to thaw only what you need. To revive day-old bundt cake, warm individual slices for 10-15 seconds in the microwave.
Conclusion
Mastering the perfect bundt cake requires attention to detail—from thorough pan preparation to precise cooling times. The six key steps outlined ensure consistently beautiful results: prepare your pan meticulously, achieve ideal batter consistency, fill properly, bake with precision, cool patiently, and finish elegantly. With practice, you’ll create bundt cakes that impress both visually and in flavor.
Ready to create your own showstopping bundt cake? Try this recipe today and share your results in the comments below! Subscribe to our newsletter for more detailed baking guides and seasonal bundt cake variations delivered straight to your inbox.
FAQs
Q: Why did my bundt cake stick to the pan despite greasing it?
A: This common issue typically results from insufficient pan preparation or cooling the cake too long in the pan. Ensure you’re using softened butter (not spray) to coat every crevice, followed by a light flour dusting. Remember to release the cake after exactly 10 minutes of cooling.
Q: Can I use a regular cake recipe in a bundt pan?
A: While possible, traditional cake recipes may not provide enough structure for bundt pans. Bundt-specific recipes typically contain more flour and less leavening to create the dense, moist texture that holds the distinctive shape. If adapting a regular recipe, reduce leavening agents by about 25%.
Q: How far in advance can I make a bundt cake for an event?
A: Bundt cakes actually improve with 1-2 days of resting, as flavors deepen and moisture distributes evenly. For maximum freshness, bake up to two days ahead, store at cool room temperature under a cake dome, and apply any glaze or icing within 24 hours of serving.
Q: What’s the best bundt pan material?
A: Heavy cast aluminum pans conduct heat evenly and create the sharpest designs. Avoid dark non-stick pans, which can cause overbrowning, unless you reduce oven temperature by 25°F to compensate. Nordic Ware (the original bundt pan creator) remains the gold standard among professional bakers.
Q: How can I tell if my bundt cake is done without cutting into it?
A: Insert a thin wooden skewer or toothpick into the thickest part of the cake (usually where it rises highest). It should come out clean or with a few moist crumbs, not wet batter. Also look for slight pulling away from the pan edges and a springy feel when lightly pressed.
Pumpkin Cake: How to Bake in 3 Steps (Beginner’s Guide)
Cinnamon Apple Cake: How to Bake the Perfect Fall Dessert
“We Value Your Feedback: Share Your Experience with Us!”
There are no reviews yet. Be the first one to write one.