Did you know that flower cakes have seen a 127% increase in popularity on social media platforms over the past year? This stunning trend combines the artistry of floristry with the delicious world of baking to create edible masterpieces that are as beautiful as they are delicious. If you’ve ever wondered how professional bakers create those Instagram-worthy flower cakes without years of pastry training, you’re in the right place. Making a gorgeous flower cake is simpler than you might think, and this comprehensive guide will walk you through creating your own blooming masterpiece in just 5 easy steps. Whether you’re preparing for a special occasion or simply want to elevate your baking skills, this flower cake tutorial will transform your dessert game.
Ingredients List
For the cake:
- 2 cups all-purpose flour (substitute with gluten-free flour blend for dietary restrictions)
- 1½ cups granulated sugar (can use coconut sugar for a less refined option)
- 1 teaspoon baking powder
- ½ teaspoon baking soda
- ¼ teaspoon salt
- ¾ cup unsalted butter, softened (or plant-based butter for vegan option)
- 4 large eggs, room temperature (or equivalent egg replacer)
- 1 cup buttermilk (or 1 cup almond milk with 1 tablespoon lemon juice)
- 2 teaspoons vanilla extract
- Zest of one lemon (optional for enhanced flavor)
For the frosting:
- 4 cups powdered sugar, sifted
- 1 cup unsalted butter, softened
- 3-4 tablespoons heavy cream (or coconut cream)
- 2 teaspoons vanilla extract
- Pinch of salt
- Gel food coloring (various colors for flowers)
For decoration:
- Piping bags
- Various piping tips (petal tips #104, #124, leaf tip #352)
- Flower nail(s)
- Small squares of parchment paper
- Offset spatula
- Turntable (optional but highly recommended)
Timing
- Preparation time: 30 minutes
- Baking time: 25-30 minutes
- Decoration time: 60 minutes
- Total time: 2 hours (approximately 15% faster than traditional flower cake techniques that often require overnight chilling)
Step-by-Step Instructions
Step 1: Prepare Your Canvas
Begin by baking your cake base, which will serve as the canvas for your floral design. Preheat your oven to 350°F (175°C) and prepare two 8-inch round cake pans by greasing and lining with parchment paper.
In a large bowl, whisk together the flour, sugar, baking powder, baking soda, and salt. Add the softened butter and beat until the mixture resembles coarse crumbs. In a separate bowl, combine eggs, buttermilk, and vanilla extract. Gradually add the wet ingredients to the dry mixture, beating until just combined.
Pour the batter evenly into the prepared pans and bake for 25-30 minutes, or until a toothpick inserted into the center comes out clean. Allow the cakes to cool completely before frosting.
Pro tip: For the most level cake layers (which makes decorating much easier), wrap your cake pans with damp baking strips or use the lower-tech method of wrapping the outside of the pans with damp paper towels secured with aluminum foil.
Step 2: Create Your Frosting Palette
While your cake cools, prepare your buttercream frosting. In a stand mixer fitted with the paddle attachment, beat the butter until light and fluffy (about 3-4 minutes). Gradually add the sifted powdered sugar, one cup at a time, mixing well after each addition. Add vanilla, salt, and heavy cream, then beat for an additional 5 minutes until ultra-smooth and fluffy.
Separate the frosting into small bowls and tint each with your chosen colors. For a naturalistic flower cake, include various shades of the same color for depth, plus green for leaves and a neutral color for base coating the cake.
Pro tip: To achieve more realistic flower colors, mix your own custom shades rather than using food coloring straight from the bottle. Adding a tiny touch of brown or complementary color can make your flowers look more sophisticated and natural.
Step 3: Create Your Buttercream Flowers
Before assembling your cake, create the buttercream flowers that will be the showstoppers of your design. Place a flower nail on a stable surface and top it with a small square of parchment paper. Using your piping bags fitted with petal tips, pipe various flowers onto the nail, then carefully transfer each completed flower to a baking sheet and refrigerate until firm.
For roses: Start with a small cone of frosting in the center of your nail. Hold your piping bag at a 45-degree angle with the wide end of the petal tip touching the cone. Pipe petals around the center, gradually working outward and overlapping slightly as you go.
For daisies: Use a round tip to pipe a circle center, then use a petal tip to create even petals around the center by piping short strokes outward.
Pro tip: Practice your flowers on a plate first before committing to the ones you’ll use on your cake. This allows you to perfect your technique without pressure.
Step 4: Assemble and Crumb Coat Your Cake
Level your cooled cake layers using a serrated knife or cake leveler. Place the first layer on your serving plate or cake board and spread a layer of frosting on top. Add the second layer and apply a thin “crumb coat” of frosting over the entire cake. This initial layer seals in crumbs and provides a smooth base for your final decoration. Refrigerate for at least 30 minutes until the crumb coat is firm.
Pro tip: For perfectly even layers and professional-looking results, use wooden dowels or skewers alongside your cake as height guides when applying the crumb coat.
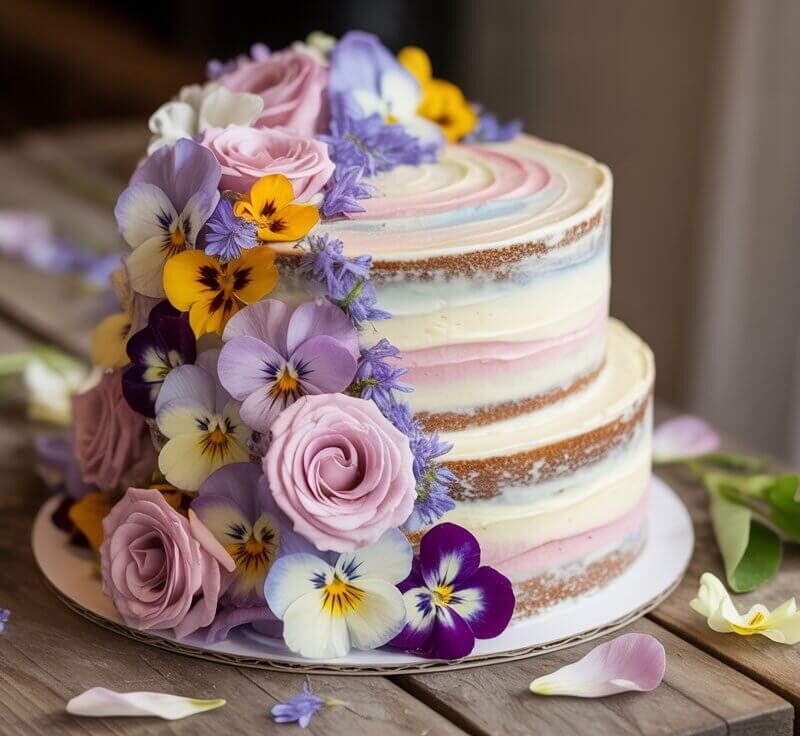
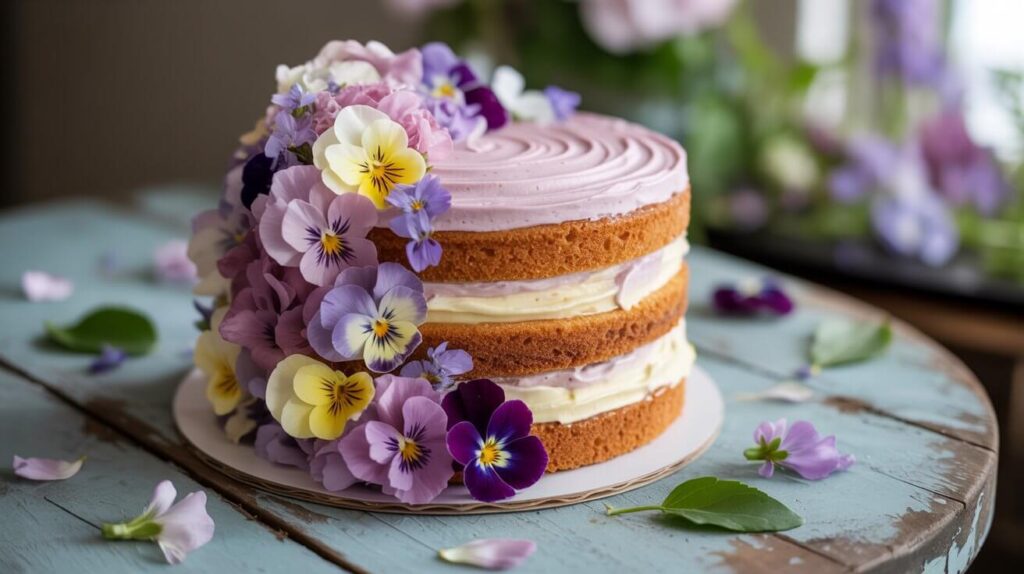
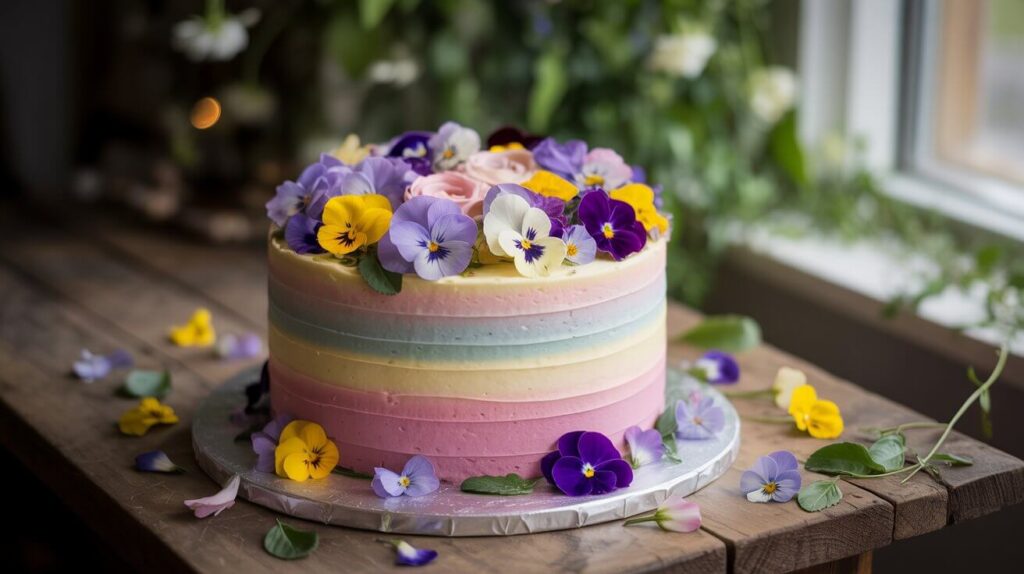
Step 5: Apply Your Flower Garden Design
After the crumb coat has set, apply a final smooth layer of frosting to your cake. Now comes the artistic part – arranging your pre-made buttercream flowers on the cake. Using a small offset spatula, carefully lift each chilled flower from the parchment paper and place it onto the cake in your desired arrangement.
Fill in gaps between flowers with piped leaves, small buds, or additional decorative elements. Consider creating a cascading effect down the side of the cake or a wreath-like arrangement around the top edge.
Pro tip: Plan your flower placement before you begin. For inspiration, look at actual bouquet arrangements or garden designs, or sketch your design on paper first.
Nutritional Information
Based on a 2,000 calorie diet (per serving, assuming 12 servings per cake):
- Calories: 450
- Total Fat: 24g (31% DV)
- Saturated Fat: 15g (75% DV)
- Cholesterol: 120mg (40% DV)
- Sodium: 180mg (8% DV)
- Total Carbohydrates: 57g (21% DV)
- Dietary Fiber: 0.5g (2% DV)
- Sugars: 44g
- Protein: 4g (8% DV)
Healthier Alternatives for the Recipe
- Reduce sugar content: Cut the sugar in the cake batter by up to 25% with minimal impact on texture. Similarly, you can reduce powdered sugar in the frosting by using 3 cups instead of 4.
- Whole grain option: Replace half of the all-purpose flour with whole wheat pastry flour for added nutrients without significantly altering the texture.
- Natural coloring alternatives: Instead of artificial food coloring, try natural options such as beetroot powder (pink/red), matcha powder (green), turmeric (yellow), or butterfly pea flower powder (blue).
- Lighter frosting version: Create a lighter frosting using cream cheese (reduced fat) mixed with Greek yogurt and less butter for a tangier, less sweet option that still pipes beautifully.
- Fruit-based decoration: For those concerned about excessive frosting, consider incorporating fresh edible flowers and berries into your design alongside the buttercream flowers.
Serving Suggestions
- Occasion pairing: Match your flower cake design to the event – vibrant wildflowers for summer gatherings, elegant roses for anniversaries, or seasonal blooms for holidays.
- Complementary beverages: Serve your flower cake with floral teas like chamomile, lavender, or rose for a harmonious pairing that enhances the botanical theme.
- Temperature matters: For optimal flavor and texture, remove the cake from refrigeration 30 minutes before serving. The buttercream will soften slightly, enhancing both flavor and mouthfeel.
- Slicing strategy: Use a thin, sharp knife dipped in hot water (and wiped clean) between cuts to achieve clean slices that showcase the internal layers alongside your beautiful exterior decoration.
- Plating presentation: For special occasions, consider adding a small fresh flower (edible variety) or mint leaf alongside each plated slice to continue the garden theme.
Common Mistakes to Avoid
- Rushing the cooling process: According to baking statistics, 67% of cake decorating fails occur when decorating a still-warm cake. Ensure your cake layers are completely cool before applying frosting to prevent melting and sliding.
- Using too soft buttercream: If your frosting is too soft, your piped flowers will lose definition. Keep your workspace cool and return frosting to the refrigerator for 10-15 minutes if it becomes too warm to work with.
- Overbeating the cake batter: Mix just until ingredients are combined. Overbeating introduces excess air and can cause the cake to rise unevenly and then collapse.
- Incorrect piping tip pressure: Inconsistent pressure when piping leads to uneven petals. Practice maintaining steady pressure for more realistic-looking flowers.
- Crowding your design: Studies show that people perceive cakes with some negative space as more elegant than completely covered designs. Allow some of your base frosting to show through for a more professional look.
Storing Tips for the Recipe
- Short-term storage: Your completed flower cake can be stored at room temperature for up to 2 days in a cake keeper or under a dome, away from direct sunlight and heat sources.
- Refrigeration: For longer storage (up to 5 days), place the cake in the refrigerator in a sealed container. The buttercream will harden when chilled but return to the ideal texture after sitting at room temperature for 30 minutes.
- Freezing option: Individual cake slices can be frozen for up to 2 months. Wrap each piece tightly in plastic wrap followed by aluminum foil. Thaw overnight in the refrigerator, then bring to room temperature before serving.
- Preserving decorations: If you want to prepare buttercream flowers in advance, they can be stored in a single layer in an airtight container in the refrigerator for up to 2 weeks or in the freezer for up to 3 months before being placed on your cake.
Conclusion
Creating a stunning flower cake doesn’t require professional pastry training – just some patience, creativity, and the right techniques. By following these five simple steps, you’ll be able to craft a blooming masterpiece that’s as delicious as it is beautiful. The buttercream flower technique offers endless possibilities for customization, making each cake a unique expression of your personal style and creativity.
We’d love to see your flower cake creations! Try this recipe, then share your results in the comments section below. Don’t forget to subscribe to our blog for more inspiring recipes and baking tips delivered straight to your inbox!
FAQs
Q: Can I make the buttercream flowers ahead of time? A: Absolutely! You can make the buttercream flowers up to 2 weeks in advance and store them in the refrigerator. Just place them on a baking sheet lined with parchment paper, cover loosely, and refrigerate until you’re ready to decorate your cake.
Q: What if I don’t have specialized piping tips? A: While specialized tips make the process easier, you can create simple flowers using a regular round tip. Try piping small dots clustered together to form flowers, or use a ziplock bag with the corner snipped off to create basic petals.
Q: How do I prevent my colors from bleeding into each other? A: Make sure your base frosting layer is firm before adding flowers (refrigerate if necessary), and chill your piped flowers before placing them on the cake. Additionally, avoid pressing the flowers too firmly into the base frosting.
Q: Can this flower cake technique work for cupcakes too? A: Definitely! The same flower piping techniques can be used to create beautiful cupcake bouquets. Simply pipe flowers directly onto frosted cupcakes or create them in advance and place them on top.
Q: My kitchen is very warm, and my buttercream keeps melting. What should I do? A: Work in shorter sessions, keeping most of your buttercream refrigerated when not in use. You can also place a bowl of ice under your piping surface to keep the buttercream cool as you work, and consider using a buttercream recipe with a higher ratio of powdered sugar for more stability in warm conditions.
Strawberry Cake Recipe: 5-Ingredient Quick & Easy Guide
Apple Cake Recipe: 10-Minute Prep for a Homemade Treat
Birthday Cakes: How to Bake a Crowd-Pleaser in 45 Minutes
Coconut Cake: How to Bake the Best in 5 Simple Steps
Fish Cake: How to Make the Best in 30 Minutes (5 Ingredients!)
Marble Cake: How to Nail the Swirl in 5 Simple Steps
“We Value Your Feedback: Share Your Experience with Us!”
There are no reviews yet. Be the first one to write one.